

Complete Beginner’s Guide
Roblox Studio 2026: Complete Guide to Creating Your First Game Step by Step
Everything you need to know to start creating an experience in Roblox: installation, map building, Luau programming, interfaces, testing, publishing, and tips for improving your first project.
📑 Guide Index
- What Is Roblox Studio?
- Requirements for Using Roblox Studio
- How to Install Roblox Studio
- The Interface: Tools You Need to Know
- How to Create Your First Game
- Building and Map Design
- How to Create Terrain and Environments
- Programming with Luau
- How to Add Gameplay Mechanics
- Interfaces and Player Experience
- How Multiplayer Works
- How to Test Your Game Properly
- How to Publish an Experience
- Mistakes You Should Avoid
- How to Improve Your First Game
- Ideas for Your First Project
- Frequently Asked Questions
- In Summary
What Is Roblox Studio?
Roblox Studio is the development tool used to create experiences within Roblox. It is the program creators use to build three-dimensional worlds, place objects, design environments, program mechanics, and test the final result before publishing it.
One of its biggest advantages is that it brings together a large number of tools within the same environment. You don’t need to use one engine to create the map, another program to write code, and a separate platform to test basic multiplayer features. Roblox Studio allows you to work on your project from a single application.
That doesn’t mean creating a good game happens automatically. The tool makes many tasks easier, but the final result depends on the creator’s decisions. You will need to think about map design, player experience, game rules, mechanics, and the pace of progression.
🎮 What Can You Create?
- Platform games.
- Survival experiences.
- Simulators.
- Racing games.
- Adventures and RPGs.
- Obbies.
- Horror games.
- Tycoons.
- Social experiences.
- Competitive multiplayer maps.
The creative freedom is enormous. That is precisely why beginners can feel lost during their first few hours. The best strategy is not to try to learn absolutely everything at once.
Start by mastering three pillars: building, logic, and testing. When you are able to create a simple environment, add a mechanic, and check that it works correctly, you will have a solid foundation for more ambitious projects.
💻 Requirements for Using Roblox Studio
Before you start, you need a compatible computer. Roblox Studio is available for Windows and macOS. To work comfortably, especially on projects with large maps or numerous objects, having more RAM and a relatively modern computer can significantly improve the experience.
| Component | Minimum | Recommended |
|---|---|---|
| Operating System | Windows 10 / compatible macOS | Windows 11 or modern versions of macOS |
| RAM | 3 GB | 8 GB or more |
| Resolution | Functional | 1600 × 900 or higher |
To create games comfortably, it is recommended to have a screen with enough space. Roblox Studio can display the map, object properties, the project explorer, and other working windows at the same time.
⬇️ How to Install Roblox Studio
The installation process is simple. First, you need a Roblox account and then you need to download Roblox Studio from the official creator environment.
- Access the Roblox platform.
- Download Roblox Studio.
- Run the installer.
- Sign in with your account.
- Open Studio and complete the initial setup.
When you open the program for the first time, you will find different options for starting a project. You can begin with a template or with an empty space.
🧰 The Roblox Studio Interface: Tools You Need to Know
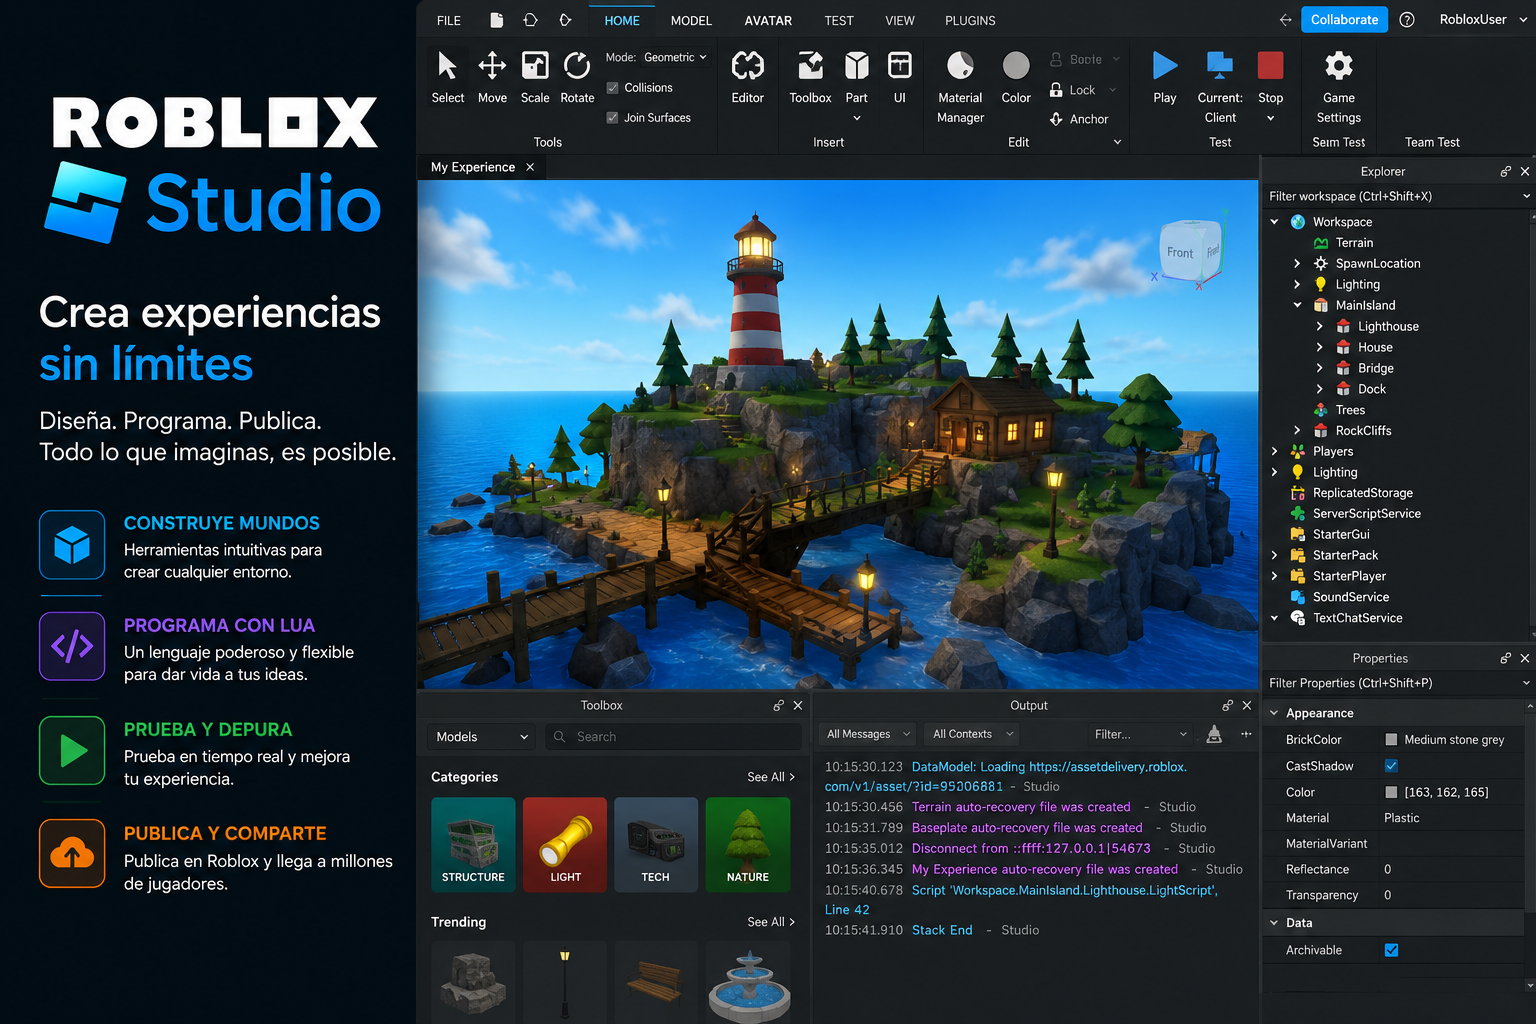
The interface may seem complicated at first, but most beginners constantly use only a few essential windows.
Explorer
The Explorer panel shows the structure of your project. Here you can see all the elements that make up your experience: objects, folders, services, scripts, and components.
You can think of Explorer as the organizational tree of your game. If the project is well organized from the beginning, it will be much easier to modify later.
Properties
The Properties window allows you to change the characteristics of the selected object. Depending on the element, you can modify its size, position, color, material, and many other properties.
Viewport
This is the central area where you build the world. Here you can move the camera and work directly within the three-dimensional environment.
Output
The Output window is especially important when you start programming. Messages, warnings, and errors generated during execution will appear here.
Learning how to read Output will save you a huge amount of time. When something doesn’t work, this should be one of the first places you check.
🚀 How to Create Your First Game in Roblox Studio
For this guide, let’s imagine a simple project: a small platform game where the player must move through different areas until reaching a final goal.
It is an excellent idea for beginners because it allows you to learn about building, checkpoints, dangerous areas, and objectives without needing overly complex systems.
Step 1: Define a Simple Idea
Don’t start by placing objects randomly. Before opening Studio, answer these questions:
- What should the player do?
- What is the main objective?
- How can the player lose?
- How can the player win?
- What will make them want to continue playing?
In our example, the player must move forward by jumping between platforms. If they fall, they return to the last safe point. If they reach the final area, they complete the level.
Step 2: Create a Starting Area
The spawn area should allow the player to immediately understand what they need to do. Avoid placing the SpawnLocation in a confusing environment.
A good starting area can include:
- A safe platform.
- A clearly visible path.
- A simple first challenge.
- A visual sign showing the direction.
Step 3: Build the First Challenge
The first section should be easy. Its purpose is not to eliminate the player, but to teach them how the game works.
🧱 Building and Map Design
Roblox Studio allows you to create environments using three-dimensional parts and objects. The basic elements are enough to build highly complete prototypes.
During your first sessions, don’t immediately try to create buildings filled with details. Start with simple shapes.
This process is often called greyboxing: building a basic version of the map using simple shapes before spending time on its visual appearance.
Why Is It So Important?
Because a beautiful map can still be boring. If you build all the details before testing the gameplay, you may discover too late that an area doesn’t work.
Test these elements first:
- The size of the platforms.
- The distances.
- The player’s speed.
- The difficulty.
- The player’s orientation.
Once everything works, start improving the visual design.
🌍 How to Create Terrain and Natural Environments
In addition to traditional parts, Roblox Studio includes tools for working with terrain. This allows you to create mountains, islands, hills, water, and other more organic environments.
The Terrain Editor is especially useful for survival experiences, adventures, and open worlds.
Types of Environments You Can Create
- Tropical islands.
- Deserts.
- Mountains.
- Valleys.
- Rivers.
- Beaches.
- Snowy maps.
- Large exploration areas.
However, remember that a huge world does not always mean a better world. A small but well-designed environment can be much more enjoyable.
⌨️ Programming with Luau: The Next Big Step
Building allows you to create the world, but programming allows you to give it behavior. Roblox uses Luau, a language derived from Lua.
With scripts, you can create systems that:
- Detect player actions.
- Open doors.
- Create enemies.
- Save information.
- Display interfaces.
- Control checkpoints.
- Create shops.
- Modify statistics.
- Generate events.
Your First Concept: Variables
A variable allows you to store information.
local message = "Welcome to my game!"
print(message)
The goal of this example is not to create a major mechanic. It is meant to help you understand that a script contains instructions that Roblox can execute.
Conditions
Conditions allow you to make decisions.
local coins = 10

if coins >= 10 then
    print("You can buy the item")
else
    print("You need more coins")
end
This type of logic is present in virtually every video game.
⚙️ How to Add Gameplay Mechanics
A mechanic is an action or system that forms part of the player’s experience.
In a platform game, you could add:
- Checkpoints.
- Moving platforms.
- Dangerous areas.
- Collectible items.
- Timers.
- Locked doors.
- Upgrades.
Start with One Main Mechanic
One of the most common mistakes is adding too many systems. A simple game with one well-designed mechanic is often more enjoyable than a project full of unfinished ideas.
Always ask yourself:
The answer should be fun before you add decorations, shops, or secondary systems.
🖥️ Interfaces and Player Experience
The interface communicates important information. It can display coins, health, objectives, inventory, and other statistics.
A good interface should have three characteristics:
- Clarity: the player understands the information quickly.
- Organization: there are no unnecessary elements taking up screen space.
- Usefulness: every component has a purpose.
Avoid filling the screen with buttons. Players should be able to focus on the experience.
👥 How Multiplayer Works
One of Roblox’s fundamental features is that experiences can be designed for multiple players.
This introduces new challenges. A system that works correctly with one person may behave differently when several players are involved.
For this reason, from the beginning you should think about questions such as:
- What information belongs to each player?
- What data needs to be shared?
- What happens when someone leaves?
- What happens when several players use the same object?
🧪 How to Test Your Game Properly
Testing constantly is one of the best habits you can develop as a creator.
Don’t wait until the project is finished to find out whether it works. Every time you add an important mechanic, test it.
What You Should Check
- Can the player get stuck?
- Is it possible to complete the level?
- Do objects appear correctly?
- Do the scripts generate errors?
- Does the interface work?
- Is the game easy to understand?
🌐 How to Publish Your First Game
When your experience is ready, the next step is to publish it.
Before doing so, review:
- The project name.
- The description.
- The spawn point.
- Important errors.
- The player’s initial experience.
- How the game works in different situations.
Publishing does not mean the project is finished forever. Development can continue after launch.
In fact, an essential part of creating games is observing what works and what needs improvement.
❌ The Most Common Beginner Mistakes
Trying to Create a Huge Game
This is the most common mistake. Many beginners immediately want to develop a massive open world with hundreds of systems.
Start small.
Not Organizing Explorer
A disorganized project becomes increasingly difficult to modify.
Copying Without Understanding
Using examples can help you learn, but you should always try to understand what each part does.
Not Testing Constantly
Small problems can become huge problems if you wait too long.
Ignoring the Player Experience
The creator knows their own game. The player does not. What seems obvious to you may be completely confusing to someone else.
📈 How to Improve Your First Game
Once the basic project works, start improving it gradually.
First: Improve the Gameplay
Ask yourself whether the game is fun even without spectacular graphics.
Next: Improve Clarity
The player should know what they need to do.
Finally: Improve the Presentation
Add visual details, lighting, sounds, and decorative elements.
| Priority | What to Improve |
|---|---|
| 1 | The main mechanic |
| 2 | The clarity of the objective |
| 3 | Difficulty and progression |
| 4 | The interface |
| 5 | Visual details |
💡 The Best Ideas for Your First Roblox Game
🏃 Obby
Perfect for learning building, checkpoints, and level design.
🏝️ Small Adventure
A map with a simple mission can teach you about exploration and objectives.
🪙 Collectible Game
Ideal for learning variables, events, and basic systems.
🚪 Escape Game
A good option for working with doors, switches, and puzzles.
🏎️ Simple Racing Game
It can help you understand checkpoints, timing, and progression.
❓ Frequently Asked Questions About Roblox Studio
Is Roblox Studio free?
Yes. Roblox Studio can be used for free to create experiences.
Do I need to know how to program?
You don’t need to be a programmer to start building. However, learning the fundamentals of Luau will allow you to create much more advanced mechanics.
Can I create a game by myself?
Yes. A small project can be developed individually. Large projects usually require more time and, in some cases, collaboration between different people.
What is Luau?
Luau is the language used to program scripts within the Roblox ecosystem.
How long does it take to create a game?
It depends entirely on the project. A simple experience can quickly become a prototype, while a large game may require continuous development for much longer.
Should I start with a large project?
No. The best way to learn is to finish several small projects.
How can I learn faster?
Combine theory and practice. Learn a concept, apply it to a project, and then try to modify it.
What should I do when an error appears?
Check Output, identify the related script, and simplify the problem. Try to discover exactly what action is causing the error.
🎯 In Summary
Roblox Studio is an ideal tool for starting to learn video game development. It allows you to build environments, create systems through programming, test experiences, and prepare projects for publication within the Roblox ecosystem.
The key to getting started properly in 2026 is not trying to create the biggest game possible. It is about finishing something small.
Build a simple map. Add a mechanic. Test it. Fix the errors. Improve the design. Then add a new idea.
With every project, you will learn something new: how to organize objects, how to design levels, how to program systems, and how to think from the player’s perspective.
🚀 Your first game doesn’t have to be perfect. It just has to be the beginning.